- Lightroom Presets
- Lightroom Brushes
- Mobile Presets
-
Photoshop
-
Learn
-
Support
-
Install
- Blog

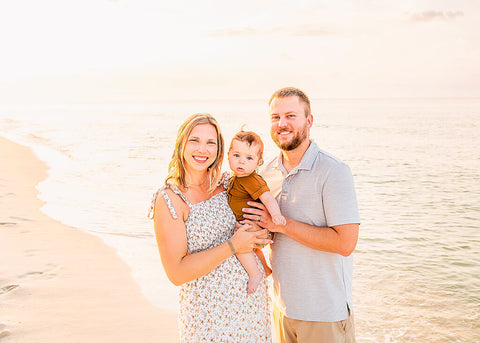
When I first started photography, I fell in love with the beautiful warm tones found in backlit photos but struggled to replicate the same warmth in my own photo sessions. With a lot of practice and studying, I learned some great tips and tools to achieve beautiful backlit photos and would like to share them with you.
I think most photographers that shoot backlight photography have their own way of doing things, but this is MY WAY of creating a beautiful backlit image.
Since backlight photography requires that the sun and the light are on the back of your subject, you will have to shoot very early in the morning, right after the sun rises, OR late in the evening, right before the sun sets.
The evening is a very common time for photographers to shoot because of the beautiful golden light available and why it's often referred to as the Golden Hour. Typically the hour right after the sun rises and the hour right before the sun sets are the best times to achieve the most beautiful backlighting possible.

When shooting with backlighting, setting your camera on Spot Metering is important.
That way, the camera will read the light from your subject's face to get the correct exposure rather than the overall light in the background.
A big misconception about backlighting is that you only have to pay attention to the light behind your subject.
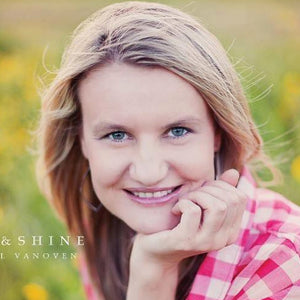
Even though that is very important, you also have to be aware of the light in front of your subject to get lovely skin tones and catchlights. If you are in an area with many trees behind you, you will find it very disappointing that even though the background looks beautiful, your subject's face can be very dark.
To avoid this, you will need to look for areas of open shade. By that, I mean an area BEHIND YOUR SUBJECT with some trees in the back to block some of the sun but still let some sun peek through the leaves, and an area BEHIND YOU where there are no trees, just a wide open field so the beautiful light from the sky can reflect on your subject's face.
If you can't find any areas of open shade, you will have to start using a reflector. You will also need an extra pair of hands for that, so bring an assistant. When photographing children, they typically move around so fast that I usually choose not to use a reflector but rather go hunting to find the right spot for my photo session.

Don't be afraid to place your subject in the shade for backlit photos, but make sure it's open shade. Look for the spot where the shade meets the bright light from the sun, position your subject in the shade, and watch for their hair for that soft sunkissed glow. Perfect!
Don't worry if your in-camera pictures don't look like they have enough sun. That's where a good Lightroom Preset or Photoshop Actions and Overlays will come to the rescue!
If you can get just the softest touch of sun-kissed glow on your subject's hair, run some of the magical actions or presets I have linked to above, and you will be amazed how the sun can be intensified in post-production.
As I mentioned, you want to ensure your camera is set on Spot Metering, and you will have to set your exposure based on the light on your subject's face. Yes, the background may be slightly blown out, but we don't have to worry about that. Our focus should be on the subject, and that's all we have to worry about.
What camera setting should you use for backlight photos? Like anything in photography, the answer is - IT DEPENDS. It depends on what type of feeling you are trying to achieve in your image.
Do you want your pictures to tell a story?
Then you should set your aperture to the highest value number f/22, f/16, f/11 (very small aperture opening) so that the whole scene is in focus.
Do you want to isolate the subject from your background?
Then you will need to set your aperture to a very low number f/1.4, f/1.6, f/1.8, f/2.0, f/2.8 (very wide aperture opening).
Here are some great blog articles to help you understand how to get the correct exposure and understand the relationship between Aperture, Shutter Speed, and ISO - or collectively referred to as The Exposure Triangle.

Unless you want to be very creative and love flare in your pictures, you will have to ensure that no flare is falling on your subject's face or skin when you are taking photos. Again you can take a few creative shots, but most people love seeing crisp, clear eyes and don't like the faded images produced when the sun comes full force into your lens.
To eliminate this, you need to position your subject right in front of a tree or any other object that breaks the sun flare from the sun. Backlit photography doesn't mean that the sun has to be directly behind the subject, so don't be afraid to move to the right or left until the sun is just to the side and does not come full force into your lens.
A lens hood or even your hand is another great way to eliminate or reduce sun flare in backlit situations.
If you are just starting out, try practicing these techniques with a doll and a chair.

Last but not least - PRACTICE, PRACTICE, PRACTICE.
Backlit photography is not something you can learn by reading. Practice makes perfect. Each season - Spring, Summer, Fall, & Winter you will see that even if you use the same field for your photo sessions, you will have to be creative and watch how the sun is moving in the sky and make the necessary changes where you position your subject according to the sun, for good backlighting.
I hope you enjoyed my tutorial.
Do you have any questions or comments about Backlighting? Leave us a comment below - we would LOVE to hear from you! And PLEASE SHARE our tutorial using the social sharing buttons (we really appreciate it)!


Comments